This guide will give you the easiest ways to create a mysterious mood in landscape photos using Lightroom.
In my many years of using Adobe Lightroom, I’ve experimented with different techniques for adding drama to images.
In this tutorial, I’ll take you through using masks and the Basic editing mode in Lightroom to substantially alter a photo’s mood.
We can change the tones and contrast of the image to make it feel like it was taken on a dark, moody, or stormy day.
Note that we’re not using sky replacement here, which has become a common AI function of other editing programs. If you’d like to learn how to completely swap out the sky, see these tutorials:
Now, let’s dive in.
HIGHLY RECOMMENDED
Popular course reveals the simple tricks to getting incredible results with Lightroom in record time.
Give Your Photos The Look They Deserve!
How to Imitate Dramatic Weather Conditions in Lightroom
I love a dramatic weather picture with contrasting clouds and a moody atmosphere. These are the intoxicating scenes that one doesn’t enjoy walking through but enjoys viewing.
However, believing you can control the weather for a photo shoot is like trying to walk on water. It can’t be done.
The good news is that Lightroom has editing features to replicate striking storms.
If you want to create the effect that a storm is brewing or a thunderstorm is erupting, use the following tricks.
Step 1 – Open Image
Head to Lightroom’s Library, select the image you wish to edit and hit the Develop button at the top right of the canvas.
Your image will open in Lightroom’s Develop module. To the right of your workspace is the editing panel.
Here are all the tools needed to convert your image into an atmospheric masterpiece.

For this tutorial, we’re using an image of a peaceful green valley. There are some slightly grey clouds in the top right corner, but in general, the scene gives the appearance of tranquillity.
Using Lightroom, we will change it from peaceful to stormy and mysterious.
Step 2 – Tone Curve Adjustment
Click on the triangle icon beside Tone Curve to access the Tone Curve panel.
To create a moody, dramatic effect like during a thunderstorm, we need to heighten contrast and shadows and decrease highlights.
For this image, we have selected the first Tone Curve adjustment button, the grey circle with a wave.
This focuses the Tone Curve’s attention on adjusting the image’s Highlights, Lights, Darks and Shadows.
Pulling the Tone Curve’s line, we reduce the image’s overall brightness by bringing the Lightness to -95 and the Darks to -58.

At the onset of a thunderstorm, the sky can become awash with a majestic pink, purple or orange hue due to atmospheric conditions.
We can replicate this look by altering the sky’s hue using the Tone Curve’s Green channel.
Click the green circle icon above the Tone Curve graph to activate the Green channel.
Drag the line down to reduce the green hue in the image and add a pinky-purple hue.

With two quick edits, the image is beginning to look closer to a moody, stormy day.
Step 3 – Create Linear Gradient Mask
There is still a lot of light in the top left corner of the image. To make the image look more moody, we will reduce this using a Linear Gradient Mask.
The mask will allow us to edit the bright area without affecting the rest of the image.
Click on the Maks button, the circle icon below the Histogram.
The Masking panel will open. From here, select Linear Gradient.

Drag your cursor across the canvas to create the Linear Gradient mask, and release your cursor when you have achieved the correct size.
Step 4 – Make Local Adjustments
We can now edit the masked area using the masking editing sliders.
We move the Exposure, Contrast and Highlights to reduce the brightness.

This changes the temperature to make the image a little cooler.
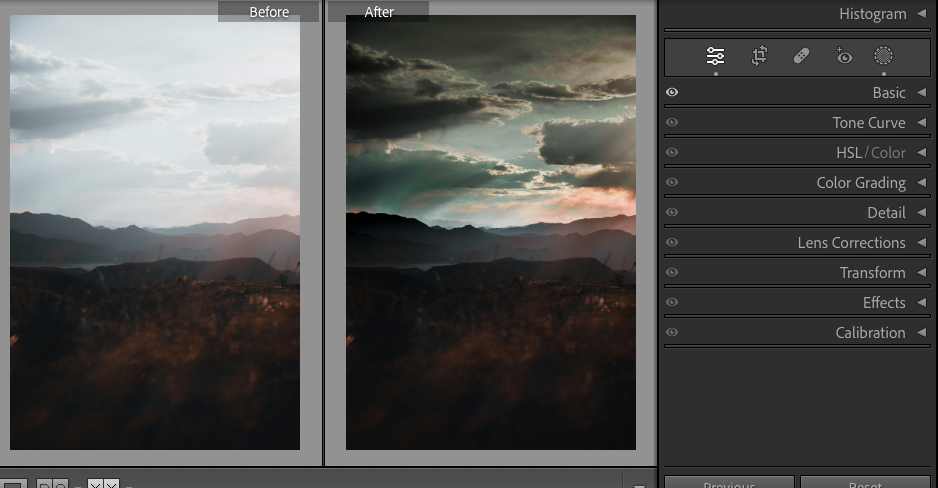
Step 5 – Preview Before and After
To view the progress of the edits, click the Before and After preview button (the YY icon) below the canvas.

As you can see by comparing the original and the edited image above, our adjustments have successfully created a moody, dramatic atmosphere.

You can use this trick when editing clouds to amp up the suspenseful, wild aspect of an image.
Turn Up the Dramatic Effect in Clouds
High contrasting clouds with clear whites and deep blacks create a striking, undeniably dramatic scene.
Sit tight, and we will show you how to change peaceful clouds into electrifying storm clouds.
First, open the image in Develop mode and access the masking panel.
From the Masking panel, select the Linear Gradient.

To create a Linear Gradient mask, drag your cursor over the clouds.

When the Linear Gradient mask has been created, adjust the settings in the Basic editing panel.
To amplify contrast, increase Contrast and Whites while decreasing Highlights, Shadows and Blacks.

The top layer of clouds are starting to look distinct, but the clouds underneath lack tone.
Checking the mask’s thumbnail, we can see that the mask covers only the top clouds.
To include more area in the mask, click on the thumbnail to activate it, then drag the masked area down to cover the lower area of clouds.

This results in stunning atmospheric clouds.

How to Mask Reflections for Dramatic Effect
If you have an image with reflections, there’s an editing trick that’s worth knowing to speed up your workflow.
You can create a Color Range mask to select the clouds and the reflection.
Open the image in the Develop module and hit the Mask button.
When the Masking panel opens, select Range.

Click on the canvas to select and mask the color range of the clouds. As the lake reflects the clouds, it will be included in the reflection.
Sometimes, Lightroom’s AI will make an inaccurate selection. You can add or subtract from a mask by clicking on the mask’s thumbnail and selecting the brush.
In the image below, Lightroom’s AI included the mountain range in the selection.

When you have refined the mask selection, adjust the editing sliders to bring down exposure and reduce highlights.
The Shadows slider controls the medium to dark tones. Decreasing it in this image will add punch.
We amp up the Blacks to add more punch and richness to the image.

We’re aiming for a somber, moody image, so we lower the Whites to -28 by moving the slider to the left.
We can add the necessary defining structure to the image by increasing the clarity.

If you are unhappy with a hue, you can use the HSL/Color editing mode to adjust it.
Using the HSL/Color mode, we can target colors to change their hue or decrease their saturation.
Next, compare the edited and original images using Lightroom’s Before and After preview option.

Play around with the adjustment sliders to achieve the best effect, because every image requires different edits.
I hope you enjoyed this tutorial and you can use these tricks to create some stunning works of photography art.
There is nothing so satisfying as sitting in the snug comfort of your home and admiring the beauty of the wild force of mother nature.
If you liked this tutorial, you will also enjoy – How to Create a Vintage Look in Lightroom.
FAQs
How to make dramatic skies in Lightroom?
To make dramatic skies in Lightroom, increase contrast using the adjustment sliders in the Basic editing panel.
Use the Clarity slider to add the necessary dramatic structure to the image.
How to make photos more dramatic in Lightroom?
There are a few ways to make photos more dramatic in Lightroom.
One way is to increase the contrast; highly contrasted photos will always look more dramatic.
Another way is to enhance the image’s texture and clarity using the appropriate sliders.
By amping up the saturation, you can also inject vibrance into the scene and add drama.
How do I create a haze in Lightroom?
To create a haze in Lightroom, make a mask over the area you wish the haze to be.
Open the Basic editing panel. At the bottom of the panel, in the Presence section, you will find the Texture, Clarity and Dehaze sliders.
Slide the Dehaze and Clarity slide to the left to create a subtle haze effect.
To add to the haze effect, increase the area’s exposure slightly to brighten the area.
How do you make moody effects in Lightroom?
To make moody effects in Lightroom, use the Basic Editing panel or Tone Curve to darken the tones.
Reducing the Whites, Contrast and Highlights while increasing the Blacks will create a moody effect.
Credit : Source Post


