Have you ever spent far too long searching for the perfect images to express an idea? Or filled your computer with endless folders, only to waste more time trying to find the right file?
Perhaps you’ve had a project derailed because the client couldn’t quite “see” your vision, and ideas got lost in emails.
If any of that sounds familiar, Firefly Boards is here to help.
Firefly makes building mood boards a fun and efficient task. In its clean and intuitive workspace, you can collect everything you need for your project.
Then, using AI tools, you can modify, mix, and generate new visuals that bring your ideas and your client’s feedback to life.
If this sounds familiar, keep reading to discover everything you can do with Firefly Boards—and why it might just become your favorite tool for planning your next project.
You’ll also find a step-by-step guide on how to make a mood board using Adobe Firefly, so you can try it out for yourself.
What Is a Mood Board?
Credit: Antoni Shkraba
A mood board is a visual tool that helps you plan a creative project.
Mood boards are a great way to communicate with your client, allowing you to see if their briefing aligns with your creative vision.
However, they can also be helpful for personal projects as you can use them to gather inspiration, plan everything you’ll need for your production, and much more.
Inside a mood board, you can collect images, videos, colors, and any other element that represents the mood, style, and direction that you want to achieve.
You can also think of it as a collage that puts everyone involved in a project on the same page.
Why Use Adobe Firefly To Create Your Mood Board?

Firefly Boards is packed with powerful generative AI tools that allow you to work faster and provide endless possibilities for translating your ideas into visuals without wasting any time.
Since generative AI is also a complex subject, you want to use it in a protected and ethical way. That’s why all AI generated in your Firefly Board is safe to use commercially.
Not just that, Adobe also leverages the use of Content Credentials. This ensures that your images have verifiable information about their origin and history, even when others modify them.
This way, you’ll add transparency to your work and provide confidence to your clients.
Speaking of changes, Firefly Boards makes it easy to work with others. Whether you work in a team or you’re asking for input from your clients, you can share your mood board, have live collaborations, or leave messages for others to see and reply to.
Firefly Boards is also fully integrated into the Adobe Ecosystem. You can search images on Adobe Stock without leaving the platform or open copies of your visuals in Adobe Express and Photoshop.
Best of all, Firefly Boards is included in all Creative Cloud memberships.
If your plan doesn’t have premium features, you’ll get a maximum of three boards for free, while memberships with premium features give you unlimited boards.
What Can You Do in Firefly Boards?

Creating mood boards using Firefly Boards is incredibly easy and flexible.
Below are a few examples of what’s possible with its main features to help you see how it can fit into your workflow.
- Look for inspirational images on Adobe Stock from inside your board.
- Generate visuals using AI models from Firefly and its partners.
- Use images on the board as a reference to generate new ones.
- Collaborate with team members.
- Communicate with messages.
- Convert images to videos.
- Generate variations of your photo, maintaining the style or subject.
- Edit your photos with tools like generative fill and expand, background removal, etc.
- Send your images to other Creative Cloud apps, such as Photoshop or Adobe Express.
- Extract prompts from a reference image to aid in prompt engineering.
- Mix elements from different images to generate a new one.
- Use Presets to simplify complex generative tasks.
How To Use Firefly Boards To Create a Mood Board?
There isn’t a one-size-fits-all method of mood boarding. Every creator has their own process, and every project comes with different needs.
So, you don’t have to take this guide as a literal step-by-step process.
This is a simple example to show you how to create a mood board within Firefly Boards. You can then adapt it to fit your needs and style.
Start a New Board

If you’re on the Firefly website, click on Boards on the left side menu to go to the Firefly Boards tool. Alternatively, go to the Firefly Boards website and click on ‘Start mood boarding’.
In both cases, you’ll land on the Boards page, which holds all your projects. Obviously, the first time you use it, you won’t see any. However, the first option you’ll see is to create a new board.
There are also a few featured mood boards for you to browse and gather ideas on what you can do.
If you enter one of the sample boards, it’ll be added to your projects. This seems like a problem if you have a standard account that only gives you three free boards. Not to worry, though – simply delete them.
In this example, I’m starting a board from scratch. To do this, click on ‘Create new board’.
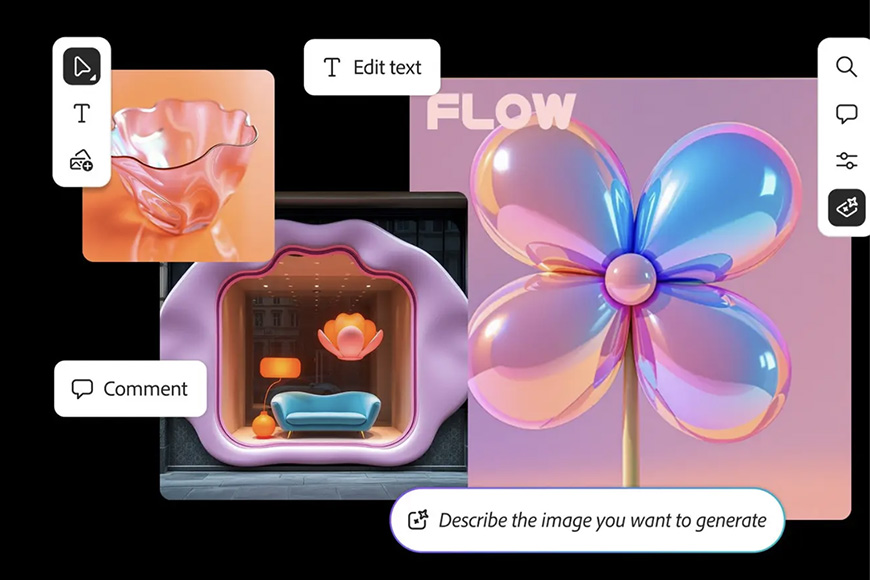
Use the Text Tool

While a mood board is a visual tool, I always need to add some text to it.
For commercial projects, I include the client’s briefing at the top. This way, anyone collaborating knows the main guideline – even if it’s just me, it helps me to stay focused.
Alternatively, I write my idea or a list of keywords that serve as reminders of what type of visuals I need.
To do this, simply click on the Text tool on the left. This will open a text box that you can move, resize, and modify in size and shape.
The Text tool comes with a wide selection of fonts, but you can also upload your own.
I often use text to categorize what I’m adding. Let’s say I’m working on a shot list; then I write the type of shot and its number above all the visuals I’m including for it.
I also like to add shapes to keep things more organized and easy to navigate. So, I often include a rectangle behind the text.
You can arrange the orders of any overlapping elements in their drop-down menu. I like to color-code my shapes, but this is up to you.
Add Reference Visuals

Now, let’s move on to the visuals. On the left-side toolbar, you’ll find the Add Image icon.
This option allows you to upload files from your device or from Adobe Cloud storage.
Alternatively, you can look for inspiration images on Adobe Stock. You’ll find this feature on the right side. Simply click on the magnifying glass icon.
You can browse images by using keywords or by uploading a reference picture.
The results will appear by default in the extended panel, but you can click the button next to the search bar to expand the view, opening it in full-screen mode.
When you see an image you’d like to use on your mood board, simply click on Add to Canva. At this point, you’re not licensing it, so you don’t need to pay.
All Adobe Stock images will have their icons in the top-right corner. This way, you can keep track of the source in case you decide to license them later.
Another way to add reference visuals is to use the ‘Find similar inspiration’ option, which appears in the pop-up menu that opens when you right-click an image in your mood board.
This will open the Adobe Stock panel with more proposals that relate to the image you’re using as a reference for the search.
Generate Variations and Proposals

Now you’ve reached the best part of using Firefly Boards – its AI tools.
The most basic approach is to generate unique content using text prompts instead of adding your visuals as described in the previous step.
Of course, you can also edit them by using the Generative Fill and Generative Expand tools.
To really make the most out of Firefly Boards, you should really try out their tools: Vary, Remix, and their multiple Presets. Using these, you can generate any content that you or your client can come up with.
You can generate variations of a current image, fixing the style or the subject.
You can use AI to generate sub-prompts that will help you craft the perfect prompt for the variation you need by describing the light, focus, and other key elements.
The image generator also lets you choose the aspect ratio and the AI model you want to use.
Adobe Firefly offers different models, but they’ve also partnered with OpenAI, Google, and others, allowing you to use models as popular as Nano Banana.
My favorite tool is Remix. Using it, you can select multiple images on your board, and it will generate 16 new ones by mixing the elements of the ones selected. This is a great way to gain inspiration.
If you need something more complex, you can use Boards Presets. Here, you’ll find actions that let you join models and products, change the pose of a model, swap products on a scene, and much more.
You can also use the Image to Video feature to convert static images into videos – don’t forget to give it a try!
Add Comments

Mood boards are rarely completed in one sitting. You can use the Comments tool to leave reminders for yourself, provide instructions for other team members, or request feedback from your client.
Of course, you can also add these things as text boxes across your board, but you risk that the other person won’t see them.
Using comments, you can tag them so you know there’s some information waiting for them. You can also add emojis or pin comments.
Share

Once you’ve set up your mood board, it’s time to share it. Simply add people and groups, or generate a link to send.
When creating a link, choose between two privacy settings: allow access to anyone with the link, or limit it to invited users only.
Keep in mind that collaborators will need an Adobe account — but a free one works just fine.
With your Firefly Board ready to share, you’re all set to collaborate seamlessly and bring your creative vision to life.
Credit : Source Post