AI hairstyle changers have become popular for trying out crazy looks without having to touch a pair of scissors.
As fun as this may be, I want to explore a more professional use for them, particularly for photographers and photo retouchers.
In this article, I’ll talk about the AI EASE Hairstyle Changer. I’ll walk you through its main features and step-by-step guides on how to use it.
I’ll also give you examples of how you can incorporate it into your photography practice and break down the pricing options, allowing you to try it and decide if it’s worth adding to your workflow.
If you’re ready to stop spending hours at your computer manually masking hair for adjustments, keep reading.
Why Use an AI Hairstyle Changer in Your Portrait Photography?
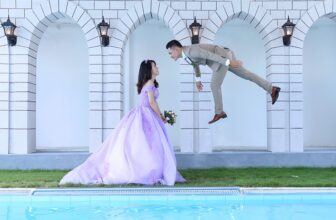
In portrait and fashion photography, hair matters – a lot!
That’s why most photographers recommend their clients have their hair done professionally, even if it’s for a personal photoshoot.
Hairstyling is even more important in fashion and editorial photo sessions, where every decision can change the mood and concept of the final image.
However, these services can be expensive. If you’re creating looks for a pitch to land the client, you might not have a big budget.
It may also be out of reach if you need multiple hairstyles throughout the shoot, not to mention the extra time and the toll it would take on the model’s hair to repeat the drying process, use dyes and chemicals, etc.
That’s why changing hairstyles in post-processing can be a good idea. However, doing it with traditional editing techniques can be time-consuming and require multiple skills.
Instead, using AI tools, you can do this in just a matter of seconds. This is where AI EASE comes in with its new tool – the AI Hairstyle Changer.
When Can You Use AI EASE Hairstyle Changer?
There are plenty of uses for the AI EASE Hairstyle Changer. Here are a few examples of how you can incorporate this tool into your photographic work.

Use the built-in color customizer or the text-to-hairstyle feature when choosing the color palette of the shot.
Are you unsure whether to opt for a monochrome color scheme or use complementary colors? Try them both and see which one looks best!

Use the Hairstyle Changer when planning a photoshoot concept with a client, offering them multiple options to choose from.

Use the Hairstyle Changer when working with a model who can’t physically cut or dye their hair the way they would like to.
Some examples that come to mind would be a high schooler whose parents won’t let them dye their hair in fantasy colors, or a man who dreams of having long hair but their job won’t allow it.

Use it to create diversity when working on building portfolios for models that need to show a broader range of styles and aesthetics.

Another popular use is when you want to generate social media engagement.
Suppose you’re marketing your portrait or headshot services. In that case, you can create interactive posts asking people to vote for different hairstyles or showing how they can see themselves differently if they book a session with you.

Last but not least, I suggest you use the Hairstyle Changer when your client is booking the session because they need to reassure their identity or try new ones.
Often, people decide to have a personal photo shoot because they’re undergoing big changes in their lives. Seeing themselves with a different look can help them deal with these transitions.
How to Use AI EASE Hairstyle Changer
Using the AI EASE Hairstlye Changer is super easy. Here, I’ll show you how you can use each feature.

You can go directly to the Hairstyle Changer using this link. Alternatively, open the AI EASE home page, scroll down to the AI Tools section, and click on Hairstyle Changer. This will open the workspace where you can do any of the following.
How To Change a Hairstyle
On the workspace, you’ll have a gallery of hairstyles on the left side. On the right, there’s a canvas where you can upload your own photo.
There are a few sample photos if you want to use them before uploading your own material.

Once uploaded, scroll through the gallery of hairstyles on the left panel and click on the one you want.
There’s a library of female hairstyles and one of male hairstyles – you can choose from any of them, regardless of the subject in the photo.
PRO TIP: Photos where the hair isn’t covering the face are better, otherwise, this could create awkward shadows when choosing a pulled-back or short hairstyle.
On the Generate button, you’ll see how many credits this hairstyle will cost. Depending on the type of membership you have and the hairstyle, it can be zero credits, two, four, or six.

You can always check your credit balance in the top right corner of the screen. This way, you can see how many hairstyles you can try.
The hairstyle is ready in about ten seconds. You can toggle between the before and after versions by clicking on the button at the top of the canvas.
If you’re happy with it, you can download your image using the button at the top right. You can choose between lo-res and hi-res (the latter is only for Pro memberships).
If you’re not satisfied, click on Generate again to have a new variation of the same hairstyle. Alternatively, try a different hairstyle – there’s no need to upload the photo again.
When you want to work on a new photo, click on Re-upload.
All your generated images can be found in the section “My Gallery,” so you can also choose to download them at a later time. However, they will only be available for 7 days for free accounts.
How To Use the Built-In Color Customization

The color customization tool is built into many of the hairstyle presets. You’ll find them at the end of the library – so keep scrolling.
Pro users can use this feature without spending any credits. So, you can recognize the available hairstyles with color customization because they won’t have the credits icon on them.
Instead, free users can use the hairstyles with color customization for two credits.
In any case, upload your photo and choose one of these hairstyles. Once you click on them, you’ll see a series of color swatches appear underneath. Select the one you want and click Generate.
How To Use the Prompt-to-Hairstyle Generator

You can also use AI text prompts to give custom parameters to your new hairstyle.
On the Hairstyle Changer workspace, change from Default to Custom on the left side panel at the top of the hairstyle gallery.
Here, you’ll first be presented with some color swatches so you can select your favorite one.
Underneath, you’ll find a space to type a prompt. You can write up to 500 characters. If you’re unsure where to start, you can click on the keywords listed below. Clicking on them adds them to your prompt.
Once you’re ready, click on Generate.
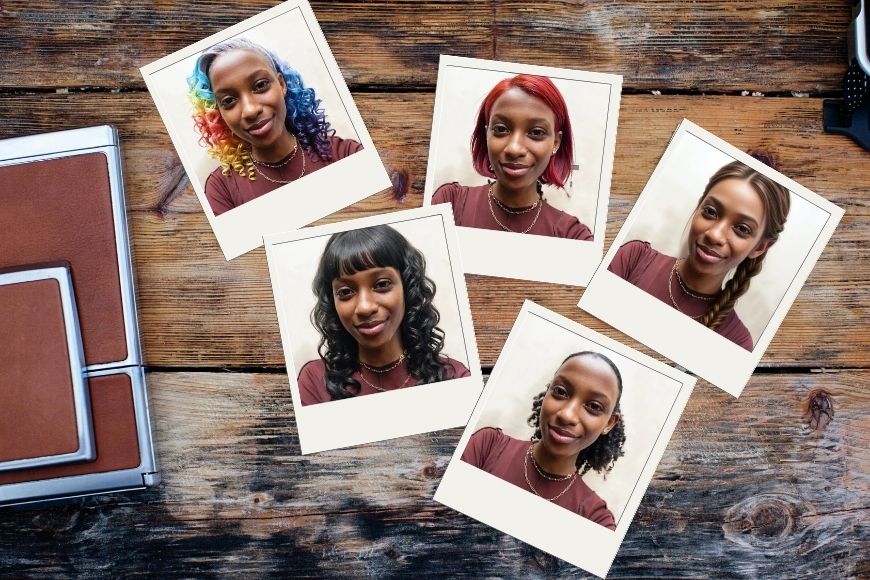
AI EASE Hairstyle Changer – Key Features
One of the standout benefits of the AI EASE Hairstyle Changer is that it offers over 120 preset styles for you to choose from. Featuring more than 80 hairstyles for women and over 40 for men, you’ll have access to an impressive library of looks.
This way, you don’t have to rack your brains coming up with ideas – simply click on whichever you find interesting.

If you can’t find anything you like in the presets or have a particular idea in mind, you can use the text-to-hairstyle generator.
Here, you can type a prompt describing what you want. You can also click on the keywords underneath if you need help finding inspiration.
Of course, hairstyling is not just about the length and shape – it’s also about the color. This is particularly important for photographers who create the ambience and aesthetic of their images based on a particular color palette.
Using AI EASE, you can forget about the endless hours you used to spend masking hair in Photoshop to adjust the hair color of the model. Now, you can use the color customization tool and try all the colors you want in seconds.
As you can see, using AI EASE, you can give your model the right look or a variety of looks without hours at the salon, damaging chemical treatments, or spending hundreds of dollars.
AI EASE Hairstyle Changer – Pricing and Packages
You can try AI EASE with a free account, which gives you limited use of the platform. The Hairstyle Changer is included, and you’ll consume 2 or 4 credits per generation.
Consider that you only get 10 credits per day, but this is a great way to see how much this tool can improve your photo editing workflow.
You can also use this opportunity to gauge your clients’ interest in a change of look as part of the editing package for the photoshoot.
When you use the free credits, your downloads are limited to low-resolution, and they’ll be watermarked. Also, they’ll remain on the cloud only for seven days.
You can buy credits in packs, starting at US$6.99. Of course, the bigger the package, the lower the cost per credit. This is a good option if you’re going to be using it sporadically.
For regular use, it’s much more convenient to subscribe. You can get a monthly or a yearly subscription, and right now they’re running a 50% off sale. So, you can get the monthly subscription for US$9.99 and the yearly one for only US$59.99.
Keep in mind that this article focused on the Hairstyle Changer. However, AI EASE has tons of photo editing features and AI tools – all of which you can use with the same subscription.
Plus, you can use the Hairstyle Changer on the AI EASE app, so it’s worth checking that out.
Credit : Source Post