I took a deep dive to see if AI could fake one of the most renowned natural photography effects: the bokeh effect.
Bokeh is an appealing out-of-focus effect, traditionally created when light interacts with the glass lens through a camera’s wide aperture.
The effect softens the areas around the subject with a hazy blur. Additionally, but not always, it produces light orbs that float around the subject.
Can this effect be created using nothing other than computer know-how and artificial intelligence, and if it can, is it up to the standard of professional photographers who use high-end lenses?
Read on to discover if software can replicate this dreamy effect that was traditionally the job of lenses and apertures.
Can AI Create Beautiful Bokeh and Depth Effects?
I made a collection of my flattest photos and set out to put AI photo editing apps to the test.
I then compared the results and techniques of the AI apps with those of DSLR cameras.
The bokeh effect makes whatever is at a different focal range from the subject out of focus, whether it’s in front of or behind the subject.
The blurred surroundings create a beautiful softening of the image, while putting the viewer’s focus on the subject.
Can AI apps recreate this and inject some depth? Some mystery? Will the results look appealing artistically? Can AI simulate optical bokeh?
Let’s take a look, starting with none other than your constant companion, the smartphone.
Smartphone Camera Integrated AI Bokeh Effect
Many digital cameras and Smartphone cameras have the bokeh effect integrated into their software.
To try it on your phone, hop into portrait mode (or portrait blur) on your smartphone and take a photo.
Your phone’s AI calculates the subject matter’s location, isolating it from its background, and then adds depth to the image.
You can’t deny that this is the ultimate in convenience.
Free AI Editing Apps
I upload my images to the online AI photo editing apps Fotor, Pixelcut, and Pixlr.
These are good apps to experiment with, as many of their AI features and tools are free to use.
I found the results were incredible and instantaneous, but manual editing options are usually limited.
Pixelcut, Fotor, and Pixlr
Once the image is uploaded, Pixlecut and Fotor’s AI automatically select the subject.
When using Pixelcut, there are minimal options for manual input. There is no option to change the subject selection.
However, Pixelcut offers the option to adjust the strength of the background blur by sliding the Blur strength slider.
Above, the image has a gentle blur, and below, an example of the strongest blur.
![]()
![]()
But although it mimics bokeh, it’s limited in its capabilities to replicate a diverse range of the traditional effect.
Fotor allows you to increase or decrease the intensity of the blur using the Blur Radius slider.

The blur is applied to the entire background at equal strength, resulting in a blanket texture that lacks additional depth.
When I want to change the AI instant subject selection, I can use Fotor’s Add/Subtract button to add or subtract from the subject area.
Fotor and Pixelcut do a good job of blurring the background, but fail to give the option to generate dancing, glowing orbs that flitter across the photo.
Next, I hop onto Pixlr, another free online AI app, and upload my image into its workspace.

The photo of a couple on a bike is fun and fresh, but I think it would look even more romantic if it had a bokeh effect, not just background blur, but also light orbs.
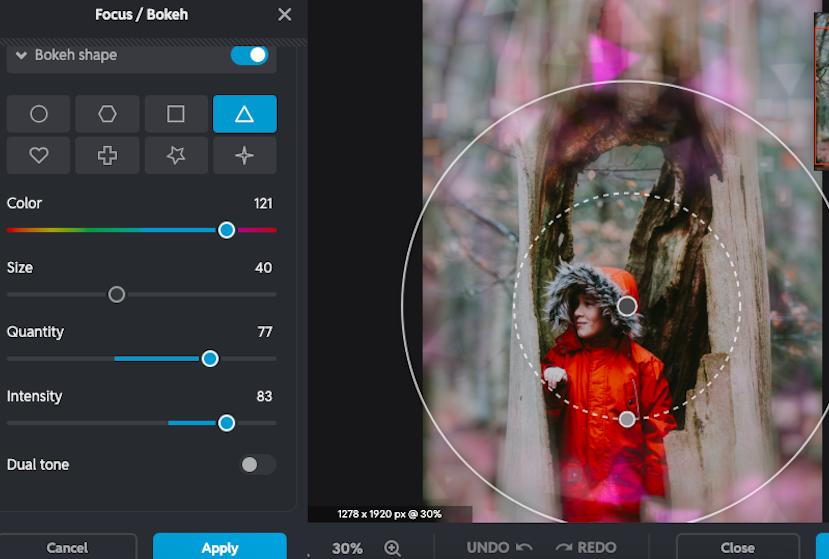
There is an option to use Pixlr’s background blur, but instead, I select Pixlr’s Focus/Bokeh feature.
When using the Focus/Bokeh effect, Pixlr does not select the subject; instead, it applies a filter over the subject.

You can add a radial, linear, or symmetrical blur. Then, you can alter its intensity and size to suit your photo.
Applying the bokeh effect in post-production with Pixlr has its advantages; you can decide exactly where you want to use the effect.
This allows you to experiment. Sometimes I add it slightly off centre, not directly on the subject. When an effect doesn’t stick to the rules, it can generate intrigue.

The photo above shows the effect added: a soft-focus background with glowing orbs in the foreground. The effect is very similar to an optical bokeh effect.
Double success! Pixlr’s AI not only replicates the specular reflections of the bokeh effect, but now my photo has an extra warm, intimate vibe.
Pixlr has an additional range of unrealistic but funky bokeh shapes.
These geometrical shapes imitate the translucent, random nature of bokeh, but in no way replicate the original.
In the image below, I added playful triangular shapes.

So far, Pixlr is the only AI app tested that gives the option to add diffused bokeh globes, albeit ones that don’t look as natural as those created by a lens.
Photoshop
Photoshop has an AI Neural Depth Blur filter, which simulates a bokeh effect.
To use it, head to Filters and select Neural filters. Under Photography, you’ll find the Depth Blur option.
Using AI, Photoshop immediately calculates the subject’s position and then estimates where to apply the artificial blur.

With the sliders, I could alter the strength of the blur, its grain size, and its color.
To be honest, I wasn’t sold on Photoshop’s AI bokeh effect.
It’s great to have the option to experiment with the blur’s colors, but there’s no option to add colored light globes?
I was disappointed by the lack of range in the depth of field, and there was no depth correction.
I guess I was expecting more from a professional photo editing software like Photoshop.
Although Photoshop is a high-end photo editing suite capable of achieving the most intricate edits, I would not run to use it to create an AI bokeh effect.
Lightroom Desktop and Mobile
Lightroom utilizes AI masking to recreate the bokeh effect. This allows the photo editor more control over the end result.
In Lightroom, I use the Lens Blur feature to create a computer-generated bokeh effect.
Select Cat Eye to add an extra dimension of bokeh to your photo. Cat Eye replicates a swirling crescent-shaped effect.
Lightroom is definitely my favorite for spinning an AI bokeh effect. It offers a nice blend of manual and AI features.
Lightoom’s AI selected all of the subjects, the three paddle boarders, but I had the option to edit the selection.

I removed the two ladies from the selection, as this fit with my creative vision.
I particularly like that I can adjust the intensity of blur in different sections of the image.
I could add a partial blur to the woman, and a high-intensity blur to the rolling hills.
Scrolling down through the sliders, I can find options to alter the detailing of the blur, sharpening, Color Noise Reduction, and Noise Reduction.

Although if you want sparkling, glowing orbs to amplify the dreamy atmosphere in your photo, you’ll have to add them yourself.
You’ll find the Lens Blur feature when using the latest Lightroom desktop and mobile, but not in Lightroom Classic.
Luminar Neo
Similar to Lightroom, Luminar Neo uses AI masking combined with manual editing to simulate the bokeh effect.
When your image is uploaded to Luminar’s workspace, head to Portrait Tools and select the Portrait Bokeh AI.
Your subject will be isolated from their background. If you wish to refine the selection, you can use the Focus, Defocus, and Restore brushes.
To alter the intensity of the blur, I adjusted the Amount slider.
When it Rocks and When it Flops
I think it’s great to have this effect on hand in a digital AI form. And who can beat the ultra accessibility when using a smartphone?
Influencers have to love the ease of use; they can add it on the go, straight from an online app.
Another great aspect of AI-generated bokeh is that you have control over the position of the focus point.
Additionally, you can also adjust the intensity of the blur. This gives you creative control similar to changing the aperture on a DSLR.
AI will quickly detect the edge of the subject, usually with impressive accuracy. Something that never fails to impress me, considering that I spent countless hours cutting pixels around subjects before the advent of AI.
And I love that you can add foreground blur, something that isn’t always possible to generate with a physical lens.
AI flops for me when the blur is a static two-dimensional flat plane, with absolutely no gradual fall off.
Sometimes, it appears as if the subject is cut out and placed onto a random, blurry background, making the whole photo look unnatural and stiff.
It appears that currently, AI can not simulate intricate bokeh depth and texture. Possibly, there are too many factors involved, making it a complicated guessing game for AI.
AI, as much as I love it, still has its imperfections. When applying a bokeh effect, you need to check that it hasn’t included or excluded crucial areas of the image.
The biggest flop for me is when the effect lacks the unique application of textured haze.
Is AI-Generated Bokeh Convincing?
AI-generated bokeh can be highly convincing, creating a compelling visual effect.
The most realistic results are achieved when using a professional AI photo editing app, such as Lightroom.
However, the effect generated by AI can sometimes lack an organic depth transition, making the photo look more dud than stud.
Professional photographers and photo editors would be able to detect that the photo had been artificially altered by AI.
Is it worth using AI to create a bokeh effect? I’d say it depends on what you wish to achieve.
Of course, if you want an effect that jazzes up your photo, then the fake look might be fine for your purposes.
However, if you’re looking for a realistic look, I would recommend using a combination of an AI app and manual edits to achieve a convincing result.

How AI Generates Bokeh
AI-generated bokeh uses machine learning algorithms to simulate the same results as a traditional bokeh effect.
AI photo editing apps use AI subject detection to isolate the subject from its background, then generate a soft focus around the subject.
Unlike traditional optical bokeh, which is produced during photography by light interacting with a lens, AI-generated bokeh is added to the image in post-production.
This can be applied immediately when using a digital camera or a phone camera that has the bokeh effect integrated into its software.
Otherwise, it can be added when editing photos on a device.
History of the Bokeh Effect
The bokeh effect is one of the hallmarks of great photography.
However, early photographers didn’t show interest in the artistic use of focus and depth of field.
The main aim of photographers was to have everything in focus.
When cameras were first invented and the first portraits were snapped, the models had to hold their position for an entire minute, sometimes even longer.
The first cameras had no lens; a pinhole camera would collect all light indiscriminately, and every part of the image was in focus.
It wasn’t until the invention of lenses and apertures that photographers could experiment with depth of field.
Initially, like the vignette effect, the bokeh effect was achieved accidentally, rather than intentionally.
Later, it became sought after and used by photographers to create more intriguing images.
The bokeh effect creates a dreamy atmosphere, as opposed to the sharpness of a photo that has everything in focus.

The contrast of blur and sharp focus draws the viewer into a more intimate setting, bringing them closer to the subject and blurring out all surrounding distractions.
It wasn’t until 1997 that the bokeh effect became a trend. A photography magazine, Photo Techniques, coined the term “Bokeh” to label the effect.
The bokeh effect derives its name from the Japanese word boke, meaning haze or blur.
Suddenly, the bokeh effect was a thing, and photographers strove to integrate an artistic blur into their photos.
Originally, bokeh was achieved by using a wide aperture and a glass lens.
A wide aperture creates a narrow depth of field, resulting in a smaller area of the photo being in focus.
Bokeh balls are created under the right lighting conditions.
Points of light, such as city lights, fairy lights, rays of sunlight, and candles, render intriguing bokeh light balls.
The shape of bokeh orbs is affected by the shape of the lens’s aperture blades. If the blades are rounded, the bokeh ball effect produced is circular.

The photo above was taken at night using a DSLR with a wide aperture. The natural light bleed is evident, creating a sultry, textured blur.
In contrast, a photo snapped in a consistent light, such as midday sun or a consistently lit room, will not render light globes.
Today, we find ourselves replicating the wonder of the bokeh effect, light refraction, and blur, not with cameras, but with artificial intelligence.
Conclusion
AI is incredible, and it’s amazing to be able to apply an effect post shoot instantly, but sometimes AI produces generic results.
The AI-generated bokeh effects may be convincing to a degree, but they lack the magic and intrigue that natural light interacting with glass creates.
AI works well when adding a generic edit, such as a blanket blur texture. However, it struggles with nuances, like adjusting the blur intensity at different focal ranges.
The human eye can immediately discern perspective and depth of field, based on years of physical interaction with the world around us.
There’s a heck of a lot of machine learning that AI will have to do to catch up.
For me, the best solution is a blend of AI automation and creative tweaks using manual edits.
Credit : Source Post