If you’re wondering how to make the most of the AI features in Lightroom, this article is for you.
Like most photographers, I’ve used Lightroom for years, and I too used to do things manually like masking skies, smoothing skin, brushing in exposure fixes, and more.
That was my rhythm of editing for a long time – until Adobe rolled out AI features, which completely transformed my workflow.
Over the last few updates, these tools have gotten smarter and more refined, making them indispensable in most editing scenarios.
Now, Lightroom uses machine learning algorithms and AI to help you perform various tasks with ease, like creating a complex mask on frizzy hair, cleaning up noise without affecting details, or replacing elements in your photo with a content-aware patch.
If you’re not using the AI features today, you’re probably missing out on major time-saving tools that can improve your photos without much effort.
In this article, I’ll walk you through the AI features currently available in Lightroom, what they actually do, and how to use them effectively.
Whether you’re a pro or a hobbyist, I’ll guide you on how to make your workflow faster and more accurate, without giving up creative freedom.
Denoise
Denoise in Lightroom is designed to clean up noise in photos shot at a high ISO or in low-light situations. Unlike older noise removal sliders, this tool uses machine learning to distinguish real details from unwanted grain.
It combines demosaicing and denoising in a single step, leaving textures, edges, and color unaffected even in photos with very high ISO numbers like ISO 51,200 or ISO 128,000.
This tool understands what a face looks like, or sky, or fabric, and works intelligently to reduce noise while preserving the original character of your photo.
Credit – Yatharth Gupta
How to use Denoise in Lightroom
At the time of writing this, Denoise only works on RAW files. Here’s how to access it:
- Open a RAW photo in Lightroom.
- In the Detail panel (right-hand sidebar), locate the Denoise checkbox.
- Select Denoise.
- Adjust the amount slider as per your requirement.
- Additionally, zoom in using the preview magnifier, or press and hold to compare before/after.
Processing time might be slow or fast depending on your hardware. On newer machines, it may take 15 to 30 seconds per file, however, older hardware could take longer.
The placement of Denoise can vary depending on the Lightroom version you’re using (Lightroom Classic, Lightroom Cloud, or LR Web).
It’s best suited for low-light RAW photos, such as night or astrophotography, as well as handheld concert or event shots. Images with grainy shadows from exposure adjustments can also benefit from Denoise.
In my tests, I found that Denoise can sometimes over-smooth fine textures like hair or foliage. It works best on well-exposed images; however, it produces mixed results with heavily underexposed photos that have been brightened by more than two exposure stops.
Pro Tips
- Apply Denoise before color grading, sharpening, or other local adjustments.
- You can add a touch of grain afterward to restore some natural texture.
- Pair with selective masking for precise control.
Read more: Best AI Photo Editing Software
Distraction Removal
Lightroom’s Distraction Removal tools transform how you deal with two of the most common issues in travel and urban photography: reflections and people.
Often, I come home from a trip with photos that would’ve been perfect if there were no distractions. Usually, I would cull these images, but now, I can rescue them with AI in Lightroom.
The Distraction Removal panel has two tools, Reflections and People, that help you remove reflections on glass and unwanted people from the frame.
Let’s look at how to use them.

Credit – Dollar Gill
How to use Reflections in Distraction Removal
- Open a photo in Lightroom.
- Go to the Remove (eraser icon) panel and navigate to Distraction Removal.
- Select Reflections.
- Adjust the amount slider to fine-tune the effect:
+100 hides reflections completely
0 shows the original image
-100 displays only the reflections - Choose Quality: Preview for fastest results, Standard, or Best depending on your resolution needs.
How to use People Distraction Removal
- In Distraction Removal, select People.
- Lightroom will detect and highlight individuals in the scene with red overlays and pins.
- Select the ones you want to remove and deselect the rest by clicking on the pin and clicking the trash icon.
- Once you’re done with the selection, click Remove. Lightroom will fill those areas based on the surrounding content.
Reflection removal is ideal when you’ve shot through glass, like at museums, aquariums, or cafes. The tool separates reflections from the intended scene using a trained AI model that recognizes the scene, lighting, and depth.
In some cases, it may produce artifacts or patchy results. However, it works wonders for the majority of images with unwanted reflections.
Pro Tips:
- To save time, use Preview for reflection removal and change it to Best or Standard later.
- If the result looks unnatural, you can slide back and add some reflection back in.
- Combine it with Masking to remove people’s reflections and get more accurate results.
Generative Remove
Lightroom’s AI-based generative remove tool is designed to help you eliminate unwanted things from your photos with minimal manual effort.
The tools under the Remove panel use AI and machine learning tech under the hood to analyze the surrounding pixels and intelligently fill in the gaps.
Whether you’re cleaning up dust spots, removing power lines, or erasing a distracting element from the background, generative AI gives you three different variations to choose from and the ability to generate more, if needed.
There are three main sub-tools under the Remove panel: Heal, Clone, and Remove, each suited for different levels of correction. However, Generative Remove is available in all of them.

Credit – Yatharth Gupta
How to use Generative Remove with Remove, Heal, or Clone Tools
- Select the removal tool of your choice: Remove (eraser icon), Heal (band-aid icon), or Clone (stamp icon) from the toolbar.
- Adjust the brush size and select the area where you want to apply the Generative Remove effect.
- Go to the Selected panel and choose Generative Remove from the Fill dropdown.
- Navigate through variations 1-3 using the arrow buttons. If you’re not satisfied with any of them, click Generate to create a new set.
Alternatively, you can use Generative AI to create a replacement where you wish to perform the Remove task.
For that, you simply go to the Remove (eraser icon) tool, adjust the brush size, tick the Generative AI checkbox, and select the object you want to remove. Then, click remove, and it gives you three AI-generated variations.
Generative Remove is perfect for things like cleaning up portrait backgrounds, removing trash from landscapes, or fixing sensor spots.
It offers the most seamless look, especially in textured areas such as grass, walls, or skies.
The AI learns and adapts as you make corrections. However, results can vary with complex backgrounds, edges, or patterns that Lightroom struggles to fill naturally.
In such cases, manual refinements or multiple passes might be necessary.
Pro Tips:
- Select a slightly larger area than your target object for removal, as Lightroom reads the surroundings to generate replacement.
- Zoom in to 100% to check for haloing or edge artifacts after applying.
- Combine small brush strokes for better control rather than one large selection.
Read more: How to Automatically Select People in Lightroom
AI Masking

Credit – Evan Jeung
Lightroom’s AI masking makes complex selections a breeze. Whether you need to isolate a person, the background, the sky, or something specific like a water body, AI does the heavy lifting for you.
It dramatically speeds up your workflow yet gives you precise control without having to mess with the brushes.
How to use Masks for Subject, Sky, Background, Landscape, Objects, or People
- Open a photo in Lightroom.
- Go to the Masking panel.
- Click on one of the AI mask options:
- Subject: Detects primary subjects like faces, bodies, animals
- Sky: Automatically selects sky elements
- Background: Selects everything that isn’t the subject
- People: Breaks down selections into Skin, Hair, and Clothing for more granular control
- Object: Choose items like trees, cars, or buildings via an object detection model
- Adjust settings as per your taste. You can also refine the mask using brush, linear, or radial tools.
AI Masking is perfect for complex tasks that used to take a long time, such as adjusting just the sky brightness, boosting skin clarity, darkening backgrounds, or zeroing in on specific colors.
It removes almost all the manual work from selections. All you need to do is fine-tune.
Sky selection, for instance, often misses tricky areas like tree branches or reflections, so a quick brush-over is still worth it.
For People masking, the automatic breakdown into Skin, Hair, and Clothing helps you avoid overdoing skin smoothness while giving you separate tonal control.

Credit – Paula Berto
This tool runs locally using Apple’s M-family chips or modern GPUs on other platforms. No internet connection is needed, but performance can vary based on your hardware power.
Pro Tips:
- Mask from the top down: select Subject first, then Sky, then Background to keep masks organized.
- Refine complex edges (like hair or foliage) with a brush if you’re not satisfied with the auto selection.
- Use Mask Overlay (press ‘O’) to see exactly where adjustments are being applied.
- When exporting, check the mask under Masking Panel > … Menu > Show Selected Mask to verify everything looks clean.
Read more: How AI is Revolutionizing Photo Editing
Adaptive Presets
Adaptive Presets in Lightroom are AI-powered presets that smartly analyze your photo and apply their effect selectively.
Unlike regular presets that apply blanket edits across the image, Adaptive Presets target specific areas like sky, subjects, or backgrounds using Lightroom’s AI masking engine.
That means when you apply an Adaptive Preset to a portrait or a landscape, it intelligently locates and enhances only the relevant parts.
You save time, get more consistent results, and maintain creative control with fewer steps.

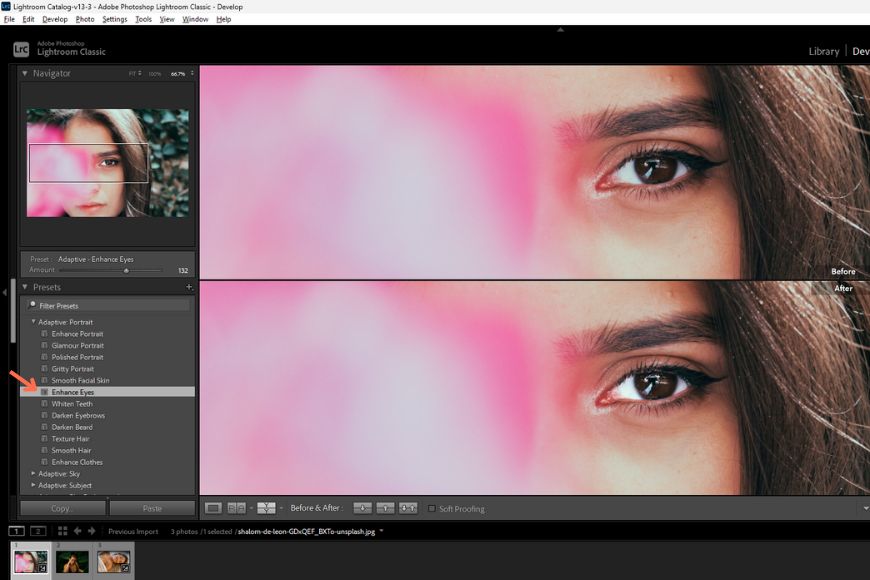
Credit – Shalom De Leon
How to use Adaptive Presets in Lightroom
- Open your image in Lightroom.
- Go to Presets on the left side panel.
- Navigate to Adaptive Presets.
- Choose from options like:
- Portrait: Enhance Eyes, Whiten Teeth, Smooth Skin
- Subject: Pop, Brighten, or Darken Subject
- Sky: Blue Drama, Warm Glow, Golden Hour
- Hover to preview, then click on the preset to apply.
- Lightroom automatically creates AI masks behind the scenes, which you can access and tweak in the Masking panel.
- You can control the intensity of effect with the Amount slider.
These presets don’t just tweak tone or color—they apply intelligent, targeted edits to specific areas. They’re ideal for one-click enhancements that used to take much longer, like brightening up the eyes.
Adaptive Presets are ideal for streamlining your workflow when editing a batch of images. For example, a “Subject: Pop” preset will brighten the person in each photo automatically, even when the subject’s position or size changes from frame to frame.
They also serve as excellent starting points. You can apply one, then open the Masking panel to adjust exposure, clarity, or tone for each selected area.
These presets work well across various genres, including portraits, landscapes, travel, and lifestyle. And they’re particularly useful for photographers who want speed without sacrificing control.
If you’re working on tight deadlines or high-volume shoots, this feature is a time-saver.
The only limitation is that they rely on the AI mask engine. So, in rare cases where subject detection isn’t accurate (like heavily backlit images or busy scenes), the preset may apply adjustments in unintended areas.
But you can always correct this using the Masking panel.
Pro Tips:
- After applying an Adaptive Preset, open the Masking panel to refine the AI selections manually.
- Combine multiple Adaptive Presets (e.g., “Enhance Eyes” + “Smooth Skin”) for compound effects.
- Use Adaptive Presets as part of a batch-editing preset group for weddings or event workflows.
Other AI features in Lightroom
Beyond masking and presets, Lightroom also includes AI-powered tools that quickly enhance your images.
These features don’t alter the creative style of your edits, but rather enhance resolution, sharpness, and clarity where it matters most.
They’re especially helpful when working with older images, small files, or shots captured in difficult conditions.

Credit – Madrona Rose
How to use Super Resolution
- Open an image in Lightroom.
- Navigate to Details on the adjustments panel on the right.
- Tick the Super Resolution checkbox.
- Lightroom will upscale the image’s pixels by 4x.
Super Resolution is ideal for cropping or printing. It doubles the resolution in both width and height using machine learning trained on millions of real-world images.
It works best on well-focused, noise-free files, and it preserves edge detail far better than traditional upscaling.
Check out our in-depth tutorial here.
How to use Raw Details
- Open a supported RAW file in Lightroom.
- Go to Details and check Raw Details (you can combine this with Super Resolution).
- Lightroom generates more details with improved demosaicing.
Raw Details helps maximize sharpness and color accuracy during the demosaicing stage, where raw sensor data is converted into an image. It reduces color artifacts and improves micro-contrast, especially on fine textures like hair or foliage.
It’s useful for architecture and other photography where fine details are important.
How to use Lens Blur
- Open a photo in Lightroom.
- Scroll down the right panel and locate the Lens Blur section.
- Check Visualize Depth to visualize focus zones.
- Adjust the effect using the following sliders:
- Blur Amount to control the strength of the blur
- Bokeh Type to change the shape and style of the blur
- Cat Eye to simulate lens-edge distortion
- Boost to intensify the bokeh highlights
- You can also choose to click anywhere on the image to change focus manually by selecting the Point/Area Focus button.
Lens Blur uses an AI-generated depth map to simulate shallow depth of field, creating a natural-looking background blur.
It’s most effective when the subject stands out clearly from the background. It adds subtle falloff and customizable bokeh to enhance portraits, products, and lifestyle shots.
Use Super Resolution when you’re working with small files or planning large prints. It’s also great for breathing new life into older DSLR shots or phone photos.
Apply it early in your editing process, before cropping or adding masks, so you don’t have to redo your work on the new file.
Raw Details is most noticeable in images with high-frequency detail, like wildlife, landscape, or macro photography. The effect is subtle; you’ll see fewer artifacts and better texture handling, especially in deep shadows and color transitions.
All three tools require moderate to high GPU performance, so expect some processing time, especially with high-resolution files.
Pro Tips:
- Use Super Resolution before cropping if you know you’ll need tight framing.
- Combine Raw Details with AI Denoise for maximum sharpness and low noise.
- Apply Lens Blur at low strength settings to keep results realistic.
- Always zoom in after Super Resolution to check for texture duplication or noise artifacts.
- If Lens Blur affects important edges, use AI Masking to selectively sharpen those areas again.
Read more: Best AI Image Cleaners
Final Words
Lightroom’s AI tools are no longer optional but have become essential for any photo editing workflow. They’re fast, reliable, and help you focus more on creativity than tedious tasks like masking, noise removal, and so on.
Once you start using them, it’s hard to go back.
Adobe is constantly updating these tools with better accuracy and performance. Staying current with these features means keeping your editing sharp, efficient, and future-ready.
Now that you know where to find these tools and how to use them, open Lightroom and start experimenting. You might find your favorite photo from last year suddenly looks even better, yet takes half the time to get there.
Credit : Source Post