This guide will give you an insight into what auto temp and white balance are in Lightroom.
Understanding and correcting white balance is essential for achieving accurate and natural-looking colors in your images, whether you’re a beginner or an experienced editor.
Let’s dive into the tutorial.
HIGHLY RECOMMENDED
Popular course reveals the simple tricks to getting incredible results with Lightroom in record time.
Give Your Photos The Look They Deserve!
Using Auto Temperature and White Balance in Lightroom
White balance is also referred to as color balance or color temperature.
White balance indicates an image’s color temperature and how cool or warm its tones are.
A camera is an amazing contraption; it can discern whether there’s a lot of light or too little. This means it’s capable of reading the strength of light.
However, a camera is not able to read the color of light that it’s capturing.
It can’t discern whether it’s on the yellow/blue light axis, such as a candle or sunlight, or the green/magenta axis.
The camera relies on you to tell it what the color is by setting the WB.
Therefore, if you forget to change the settings, the white balance will most likely be incorrect.
But don’t worry. Lightroom can help you correct white balance errors using the Tint and Temp White Balance sliders.
Lightroom can automatically fix white balance mistakes for you.
Clicking “Auto” indicates what Lightroom thinks is the best white balance setting for the photo.
Whether you decide to use it is up to you. What it does do is give you an indication of where to start when correcting a photo’s White Balance.
After all, the final decision is up to you. Computers don’t have a human eye; they can only gather information and give it a shot.
So now you know the advantages of the Auto White Balance feature in Lightroom, here’s how to use it.
Step 1 – Open the Image In the Develop Module
Select the image you wish to adjust from Lightroom’s library.
Once selected, head to the top right-hand corner of the workspace and click Develop.

Step 2 – Open The Basic Panel
When the Develop module opens, click on the triangle beside Basic in the right-hand panel.

The Basic panel will drop down.
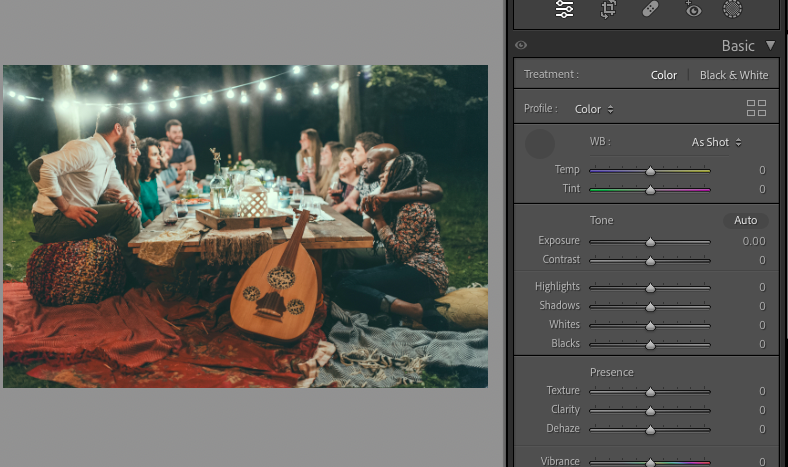
At the top of the Basic panel, you will find the White Balance sliders – Temp and Tint.

For this tutorial, we are using an image of an outdoor dinner party.
Step 3 – Select Auto White Balance
Above the White Balance sliders, you will find the words ‘As Shot’.
Click on the two arrows beside As Shot and a drop-down menu will appear.

Select Auto.
When Auto has been selected, the White Balance sliders will jump to a new position.
As you can see in the image below, the Temp slider is now set at -6 and the Tint slider at +2.

This means that Lightroom believes the image’s warm tones (yellow) were too high, while the magenta tint was too low.
Comparing the two images, you can see that the image’s warm tones have been toned down after the White Balance correction.
Step 4 – Adjust Lightroom’s Auto Settings
You might be happy with Lightroom’s automatic correction; it absolutely hit the nail on the spot.
If this is the case, you can leave them and continue editing.
But if the automatic correction looks slightly off to your eye, you can go ahead and tweak the results.

Lightroom has made the correct corrections by decreasing the yellow temperature; the lighting at the dinner party was cool-toned, not warm.
However, we may choose to alter the settings due to artistic preferences.
In this case, we want to accentuate the image’s warmer tones to create a welcoming party vibe.
In the image above, we have increased the Temp slider to +4 and left the Tint slider where it was at +2.
At any stage, you can take the image back to its original White Balance by clicking the As Shot button.
If you want to restore the image to its unedited version, go to the bottom left of the Develop workspace and click the Reset button.
Step 5 – Correcting Raw Image White Balance
When you edit an image shot as a RAW file, the automatic White Balance editing options are slightly different.
Not only can you select Auto from the drop-down settings, but you can also select Daylight, Cloudy, Shade, Tungsten, Florescent and Flash.
This means if you select Cloudy, Lightroom will automatically alter the image’s White Balance so it appears as if it were shot on a cloudy day.
A RAW file contains all the lighting information from the shoot, giving you more post-shoot editing options.
Shooting in RAW allows one to alter the white balance to suit any lighting situation.
In comparison, a JPG is a smaller file that selectively culls the lighting information depending on the camera settings.
We hope you enjoyed this tutorial, and you have a better understanding of how to use Lightroom’s Auto White Balance.
If you would like to check out more Lightroom tutorials, try – How to Defringe in Lightroom (Remove Aberrations).
Have fun editing!
FAQs
Should I use auto-white balance in Lightroom?
When using Lightroom, you can adjust the white balance manually, use a custom setting, or select an auto white balance option.
Using the auto white balance can be a quick WB fix and is advised for beginner photo editors.
If it doesn’t achieve the exact desired results, you have the option to tweak the settings manually.
What is white balance temperature in Lightroom?
White balance in Lightroom refers to the color temperature of the photo.
White balance temperature refers to how warm or cold the light in a photo is.
How do I get the perfect white balance in Lightroom?
To get the perfect white balance in Lightroom, you can use the auto white balance.
Alternatively, adjust the Temp and Tint sliders until you create the desired result.
Should I use auto in Lightroom?
It is usually recommended that beginners use the auto options in Lightroom.
The reason for this is that editing in Lightroom can be complex at first. One wrong setting can take the photo in completely the wrong direction.
Use auto for the first step and fine-tune the results to perfect the edit.
Credit : Source Post