Are you a landscape photographer? Then I have great news for you!
Lightroom just got a serious update that’ll make your life so much easier – it definitely has for me.
I’m talking about the introduction of an AI-powered Landscape Masking tool. This tool can isolate architecture, vegetation, water, sky… it can even distinguish between artificial and natural ground.
Now, you can make all the necessary adjustments to each part of the picture with just a few clicks.
In this article, I’ll show you how it works. So, keep on reading.
How to Use Lightroom’s New AI Landscape Masking Tool
We all know that masking is a challenging and time-consuming process. The inclusion of AI technology into Lightroom’s masking tool was a huge advancement that simplified our lives.
However, unlike portrait photographers, landscape photographers didn’t have many tools dedicated to their genre. Aside from sky replacement, there weren’t many AI masking options to help make selective adjustments to a landscape.
Well, those days are over! Since April 2025, Adobe has introduced a dedicated tool called Landscape Masking. It’s powered with the latest AI technology, and it’s as versatile as you would expect.
Step 1
First of all, you need to import your images into Lightroom.
If you don’t already have it, you can download it here (Adobe offers a free trial). If you’re already an LR user, you can skip this explanation and head on to the next step.
New users should know that you can’t access and edit images on your computer directly when working in Lightroom. First, you have to import them into the Lightroom Catalog.
This means that you can create collections, smart collections, tag, rate, and of course, edit your images inside Lightroom while keeping your originals safe and sound.
You can see the images you’ve imported in the Library module. On the left-side panel, you’ll find all the folders and collections, allowing you to organize and browse all your photos.
To import new images, simply click on the Import button in the lower left corner or go to the menu File > Import Photos and Videos.
Step 2

Once your image is in the Library, select it and proceed to the Develop module to make all necessary edits. You can start by doing all the global edits.
Once you’re done, you can do the selective edits. This is where you’ll need the masking tool.
You’ll need to go to the Masks panel on the right side of the screen. It’s the second one from the top, right below the Histogram.
Here, click on the Masking tool, represented by the circular icon with a dotted edge. Alternatively, you can use the keyboard shortcut ‘Shift + W’.
Step 3

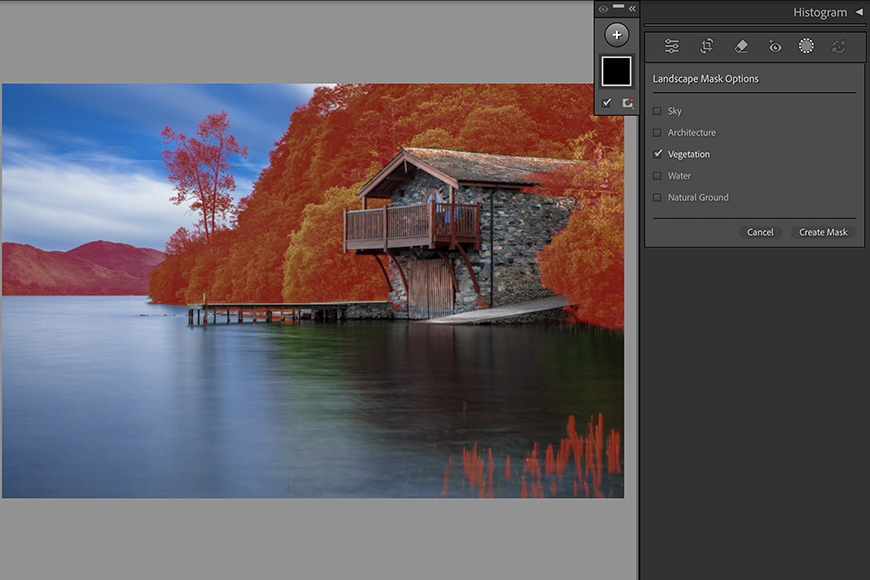
On the Masking tool menu, select Landscape. This is the first option on the list, located directly below the three large icons.
As soon as you select it, the AI will begin analyzing your image to identify potential items to mask. The possibilities include:
- Sky
- Water
- Mountains
- Architecture
- Vegetation
- Natural ground
- Artificial ground
Not every category will appear each time you use this tool; it will only give you the option to mask elements that apply to the specific photo you’re working on.
Please note that some elements may be included in more than one mask. That’s OK, I’ll explain later how you can refine the masks if needed.
Step 4

Once the possible masks appear, you can hover over them, and each part will light up in red. This is a preview of which parts would be masked if applied.
You can disable the overlay by unchecking the box labelled “Show Overlay.” I don’t recommend this option. You can also change its color by clicking on the red swatch and choosing a different one.
To apply a mask, simply click on it; a check mark will appear in the corresponding box. You can check more than one at a time.
Then, click on Create Mask.
Step 5

Now that you have your mask, you can make any edits you want, and they will only modify the selected area – it’s that simple.
You can always create more masks that will appear as layers in the panel.
It’s always possible to go back to a mask and modify it, delete it, or make it interact with the others. Simply select it in the panel and choose the action you need.
How to Modify a Mask Created by the AI Landscape Masking Tool
The AI Landscape Mask is a powerful tool that can save you a significant amount of time and effort. However, it isn’t always perfect.
Sometimes, the mask includes something you didn’t want to adjust, and other times it may be missing something. Regardless, you can add or remove parts of the mask at any time.
Add and Subtract

Once you’ve created a mask, you can see that it has a three-dot menu where you can invert, delete, duplicate, and more. However, most of the time, what you’ll need to do is add or subtract part of it.
To enable these options, all you need to do is click on the Mask.
Then, you’ll see the buttons Add and Subtract appear underneath. Click on the one that’s right for you and select which masking tool you need.
You can choose Landscape if you want to add or subtract one of the elements recognized by this tool. However, you can also use any of the other tools, like Brush, Gradient, etc.
Enjoy using this new feature to speed up your Lightroom edits!
If you want to learn more ways to leverage AI in your LR editing workflow, check out this post: How to Make the Most of AI in Adobe Lightroom.
Credit : Source Post