Have you tried the new Adjust Colors feature in Photoshop?
Color correction and manipulation are a big part of photo editing – they always have been. That’s why Photoshop has numerous tools designed to simplify this time-consuming task.
Now, Adobe has introduced a new feature that aims to make your work much easier and faster than ever before. Whether you’re a professional or a beginner, you’re going to love it.
HIGHLY RECOMMENDED
Download a free copy of Adobe Photoshop to follow along with this simple tutorial.
If you want to change a blue jacket into a red one, an orange car into a silver one, or a green summer scene into an orange-yellow autumn landscape, now you can do it in a few clicks.
Forget about making complex selections and masks. With Adjust Colors, the six most prominent colors are automatically detected, letting you tweak hue, saturation, and lightness directly from the floating Contextual bar.
You can also choose which colors to adjust, revert any single color back to its original state, and enjoy fully non-destructive editing.
If you want to learn how to use the new Adjust Color feature, keep on reading.
How to Use the New Adjust Colors Feature in Photoshop

There have always been ways to adjust colors in Photoshop. Levels and Curves let you fine-tune tone, while Color Balance and Hue/Saturation help target specific color ranges.
However, these methods affect the entire image. To isolate a single element or color using them, you would have to make a selection.
Well, you no longer have to worry about that, thanks to the Adjust Colors feature.
This is a new tool released at MAX London 2025. So, make sure you’re using the latest version of Photoshop. If you don’t want to update just yet, try using it in Photoshop Beta.
I should note that whenever the Crop tool is enabled, the Contextual Bar changes, and you won’t see the Adjust Colors option. If you see the Generative tool instead, simply change to the Move tool or any other feature from the toolbar.
Now, you should see the new Adjust Colors tool on the Contextual Task Bar.
Click on it and you’ll notice two things. First, the bar will now show color swatches that represent the predominant colors of the pictures.

Also, if you go to the Layers panel, you’ll see a Hue/Saturation adjustment layer. So, anything you do is non-destructive.

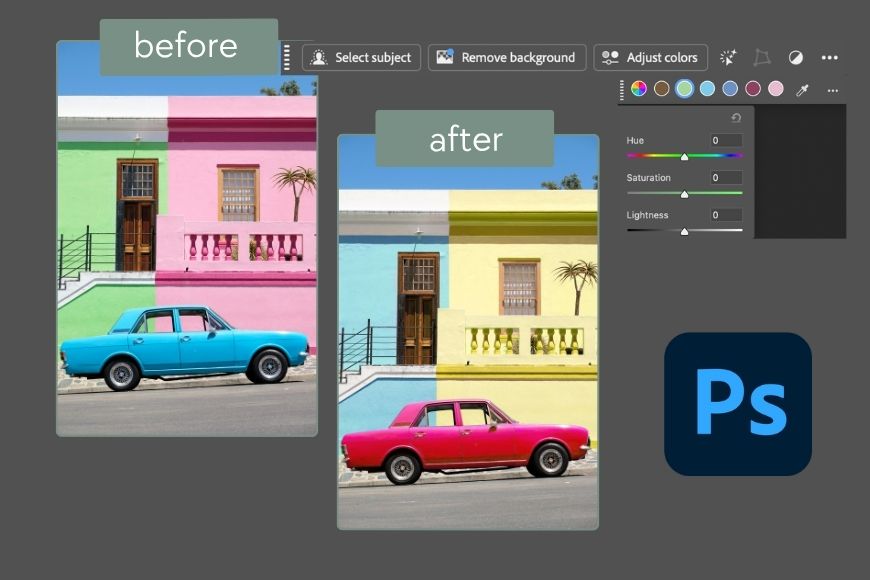
To adjust a color, simply click on the swatch, and an HSL panel will appear. Here, you can adjust the hue, saturation and lightness of the selected color by using the sliders.
As you move any of the sliders, the effect will show live on the picture. You’ll also notice that the swatch changes to reflect the before and after colors.

You can see in the example above that the pink house is now green. In the corresponding swatch, you’ll now see half of it pink and the other half green to represent the before and after.
Any color swatch that’s been adjusted will have a dot next to it. This way, it’s easier for you to keep track of your changes. At any point, it’s possible to click on the swatch and make changes.
You can also revert to the original color by clicking on the arrow icon in the top right corner of the HSL panel. This will only affect the changes done to that color; the rest will remain the same, even if it was edited afterwards.

To return to the originals, simply click the three dots on the far right and select ‘Refresh Prominent Colors’ from the menu.
On the right side, after the swatches, you’ll notice an eyedropper tool. This allows you to change the swatches if you’re not satisfied with the selection of prominent colors.
Just click the swatch you want to change, then select the eyedropper and click on a new color in your image. This will change the swatch – you can do this for all six swatches.
How To Refine the Effects of Adjust Colors
While the Adjust Colors feature is a big time-saver, it may need some tweaking. Here are two techniques you can use to fine-tune the results.
Use the Properties panel
Any tool in Photoshop has multiple settings you can access on the Properties panel. The Adjust Colors feature is no exception.
While the Contextual Task bar has a limited selection of settings for quick access, you’ll have much more control if you go to the Properties panel on the right side.
If you can’t find it, you can make it visible by going to Menu > Window > Properties.

To refine the effects of the color adjustments, you can use the Before – After slides at the bottom of the Properties panel. Here, you can stretch or contain the color range that’s being affected. This works in the same way it’s always worked.
You can also use the eyedroppers with a plus and minus sign next to them to add or remove a specific shade.
Use the Layer Mask
As I mentioned before, when you use the Adjust Color feature on the Contextual Task bar, it will create a Hue/Saturation adjustment layer.
Here, you can create a mask to control which parts of the underlying layer you want to make visible and which ones should be covered by this new layer.
To do this, ensure the layer mask is selected. Then, enable the Brush tool and set it to black. Now, wherever you paint will reveal the original colors.
If you want to make something visible again, simply change the brush color to white. Let me show you.

In this example, changing the blue of the car also changes the color of the sky, even though it’s another shade of blue.
One way to fix this is by adjusting the tonal range in the Properties panel to limit the affected area.
However, in this case, it’s easier and faster to simply select the sky with the rectangle marquee tool and make a mask.
As you can see, this took me just a second, and now the sky is back to its original color.
Ready to try the new Adjust Colors tool? Give it a try, and let us know how you get on in the comments.
Credit : Source Post