
This is a guide to the moiré effect in photography, exploring what causes it and how to deal with the problem.
Most photographers have experienced the moiré effect when shooting clothing and other objects that feature fine patterns.
In this guide, I’ll show you how to spot the issue and break down how to avoid moiré when setting up a shot or reduce moiré in post-production.
What Is the Moiré Effect?
The moiré effect is an effect that occurs in photography when repetitive lines, colors, or dots appear throughout the image.
Typically, these moiré patterns are unwanted and tend to occur when photographing subjects or objects with fine detail.
These unwanted patterns of interference are a relatively new phenomenon that became an issue with the introduction of digital image sensor technology.
When photographing an object that features fine patterns, they combine with the sensor’s megapixels to create a distorted moiré pattern on the image.
This distortion is also similar to aliasing, and moiré occurs when the two patterns conflict with each other.
The issue can also lead to false colors degrading the overall image quality and creating the appearance of colored moire patterns that resemble oil on water.
What Causes the Moiré Effect in Photography?
There are a variety of reasons why your photographs might exhibit moiré patterns and a distorted, grainy aesthetic.
Photographing computer screens and other electronic displays can often create rainbow-colored moiré patterns as the display clashes with the camera sensor.
Some types of clothing are also commonly behind the moire pattern effect, with repetitive patterns such as lines and dots notable causes.
Other photography subjects, such as bird feathers and closely arranged lines found in some types of architecture, can also create moiré patterns.
In short, anything that features a fine pattern has the potential to create interference patterns on account of the camera’s sensor.
When the straight grid from the sensor becomes overlaid with a curved grid from the subject’s detailed patterns, the moiré effect is present
To help illustrate what to look for if you think you’re dealing with a moiré pattern, here are some examples of the problem in photographs.
Moiré in Photography: Examples
The moiré pattern is a distinct feature that many modern cameras are prone to exhibiting when shooting repetitive details on clothes and other objects.
Here are two examples to help you identify when you’ve experienced moiré patterns in your photography so you know what to look for.
Moire effect in architecture
Some buildings are prone to the Moire effect when they feature dominant lines that conflict with the sensor
In this image, you can see how the fine detail around the warehouse’s shutters conflicted with the lines of the camera’s sensor resolution.
Rather than reproducing the horizontal lines of the shutters accurately, the original pattern has been distorted and resulted in the moiré effects.
How Much Do You REALLY Know About Photography?! 🤔
Test your photography knowledge with this quick quiz!
See how much you really know about photography…

Camera settings such as the focal length and a small aperture can also increase the likelihood of this optical phenomenon occurring.
Moire effect in patterned clothing
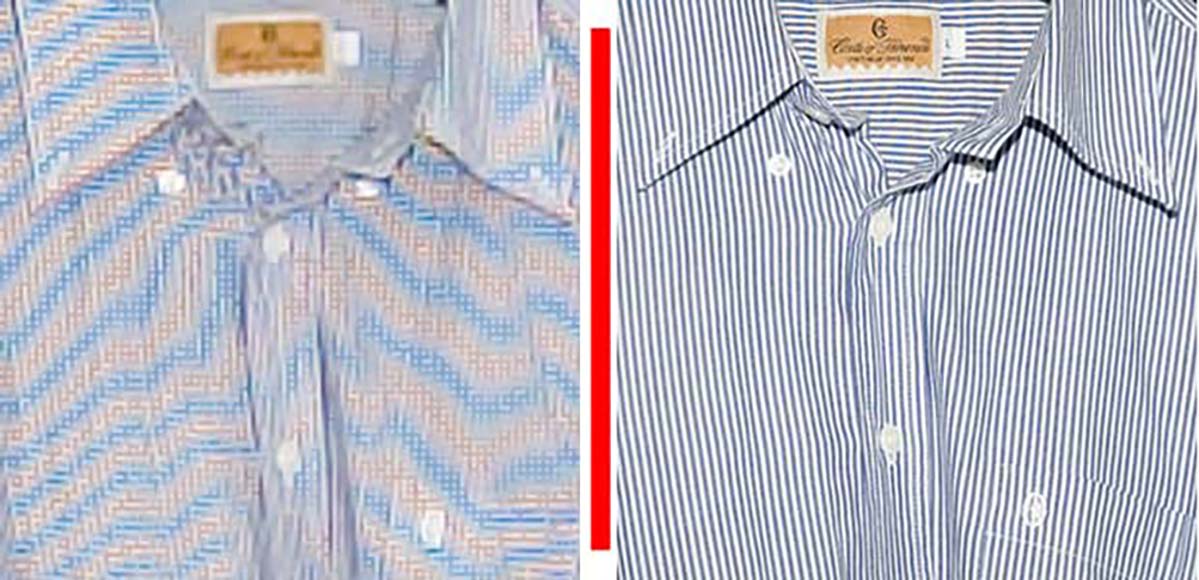
Photographing patterned clothing can be problematic when dealing with the moiré effect
In this second example, a digital photograph of a shirt shows the moiré visual effect, which is clearly pronounced and distracting.
The original image shows notable degradation through aliasing and a reduction in sharp details and clarity due to a combination of camera angles and fabric patterns.
Choosing a camera with a lower resolution will often reduce the chances of moiré occurring. This is because the optics don’t have the high quality to cause aliasing.
How to Prevent the Moiré Effect
There are many options you can consider for avoiding moiré during a shoot or reducing moiré through post-processing techniques.
If you have the time and patience to do so, you can begin by taking plenty of test shots whenever shooting subjects that may be likely to cause the effect.
For each test shot you take, use the camera’s LCD or EVF display to zoom in on the texture of the image and assess the level of moiré.
If you notice the moiré pattern on your image, reshoot the subject from a slightly different angle to see if this prevents the problem.
You can also try moving physically closer to the subject and changing the composition of the image slightly to reduce aliasing and moiré.
Another potential solution is to experiment with your camera’s aperture settings, increasing the F-stop through trial and error.
A smaller aperture of around f/11 or higher can solve the issue since diffraction softens the overall image and subsequently reduces moiré patterns.
Playing around with different focal lengths and testing a different lens can be combined with settings to test photos for the best results.
Do Anti-Aliasing Filters Prevent Moiré?
One of the best ways to reduce moire when shooting photographs is to use an anti-aliasing filter, also known as a low-pass filter.
These are used in some digital cameras to blur the image slightly and reduce the overall sharpness of patterns that can lead to the moiré pattern effect.
By lowering the sharpness of high-frequency patterns, the aliasing they produce is kept to a minimum through in-camera digital processing.
How Do I Know if My Camera Has an Anti-Aliasing Filter?
While many high-end mirrorless and DSLR digital cameras include an anti-aliasing filter, not all models have this feature.
The easiest way to verify whether or not your camera includes this feature is to check the specifications or contact the manufacturer.
Bear in mind that it may be listed in the specs as an optical low-pass filter, so look for this phrase when verifying your camera model.
If you can’t find this information online, you can also contact the manufacturer directly and inquire about this filter.
Some digital cameras also allow users to turn the anti-aliasing filter on and off, which can give you additional control over your image results.
This can be great for mastering photography in various scenarios and allows you to further fine-tune your settings.
How to Remove Moiré In Post-Processing
Taking a photograph only to discover the picture quality has been compromised by a moiré can be a frustrating experience to deal with.
Fortunately, if you notice aliasing, there are several methods you can try to reduce moiré and the associated rainbow pattern in post-production.
Let’s begin with breaking down how to handle moiré reduction when using Adobe Lightroom for your photography post-processing.
How to Remove Moiré in Lightroom
While reducing moiré in post-production tools can be tricky, several methods can help achieve results in Adobe Lightroom.
One method is to use the adjustment brush in the Develop module and change the brush size using the moiré slider control.
First, move the moiré control up to 100, then alter the brush size according to the degree of the effect on your photograph.
You can then apply this to the affected areas of the image using the brush to bring the degree of moiré back down to a satisfactory level.
Lightroom can also reduce moiré through the Luminance settings through adjustments to the shadows and highlights.
This can be handy when dealing with a color moiré pattern, combined with utilizing the program’s Color Noise Reduction tools.
Again, select Color Noise Reduction from the Develop tab and use the slider to reduce and eliminate the moiré effect from your photograph.
How to Remove Moiré in Photoshop
If you’re having problems fixing the moiré effect using Lightroom, Photoshop has a few tools you can use to achieve great results.
Your first step should be to open the image in Photoshop and head to the Camera Raw Filter to bring up the software’s ACR window.
From here, you can use the Adjustment Brush tool to paint over any areas where the moiré pattern is present, then adjust the Moire Reduction slider.
Once the rainbow pattern has disappeared, you can turn the overlay mask off and view the end results.
If you’re struggling to get rid of an unwanted rainbow pattern, there are other options you can try when using Adobe Photoshop.
Photoshop’s Color Modes and Color Channels can be fiddly to use effectively but will deliver good results when used correctly.
To use these tools in Photoshop to remove moiré:
- Use a selection tool such as the magnetic lasso tool to select the areas of the photo where the moiré pattern is present. This can also be accomplished by using the software’s Quick Mask Mode.
- Next, choose the Eyedropper tool and select the correct color required for your image, avoiding selecting anything in the area affected by moiré.
- Create a new layer and fill this layer with the foreground color; combined with the color selection, this will remove some of the undesirable rainbow patterns from your image.
While this process will minimize the rainbow effect associated with moiré, you may still be left with wavy elements in your image that need addressing.
You can do this by following these instructions:
- Create a new layer matching the area previously highlighted and set the Mode to Color before filling the image again.
- Go to the Use menu for the Contents and select White, then edit the hue and saturation until unwanted pattern elements are eliminated.
The moiré effect can be tricky to remove entirely, so prepare to spend a little time and patience while you experiment with the settings.
Photoshop’s graduated filter and radial filter also include the moiré reduction feature, so try experimenting with these if the above methods aren’t getting you the results you want.
FAQs on the Moiré Effect in Photography
How do you pronounce moiré?
If you’ve only read the word “moiré” online, you may be wondering how to pronounce it in conversation.
The word comes from the French language, with the pronunciation mwaˈɹeɪ, or “mwar-ray”.
If you’re still unsure, check out the many online videos that include audio clips of the word “moiré” with an accurate pronunciation.
What are moiré and defringe in Lightroom?
Lightroom features many powerful tools you can use to enhance your images and eliminate moiré in a few simple steps.
Perhaps the most effective of these tools in Lightroom is the defringe tool, which can be used to remove unwanted patches of color and chromatic aberration.
With this tool, users can select a brush and use this for moiré reduction in selected areas of the photograph for optimal results.
Is the moiré effect different in photography vs videography?
The moiré pattern issue can affect both photography and videography, particularly when using the same high-resolution sensors.
While the cause and appearance of the effect are essentially the same, it can be trickier to deal with in videography since it impacts multiple frames.
Videographers can avoid the effect by adjusting the camera angle or, as with photography, using an optical low-pass filter when shooting.
Can the moiré effect be used creatively in photography?
There are very few circumstances where photographers and videographers would intentionally degrade their image quality by introducing the moiré pattern.
If you wish to add these repeating patterns in your images for abstract effects, you can accomplish this in post-production by altering duplicate layers.
For example, these duplicate layers of a detailed pattern can be scaled and rotated, then blended by adjusting their opacity.
Credit : Source Post


