AI is rapidly reshaping the world in front of our eyes. Some run in terror, while others embrace it with wide-open arms.
Adobe, the long-time leader in image editing, has made it its mission to integrate the best of AI into its products as a way to further improve the sublime editing experience users have come to expect.
Adobe has included AI features and tools into its software so that photo editors can benefit from the speed of AI while retaining the control that manual editing allows.
I learned how to avail of AI tools to streamline my editing experience and cut down on the many tedious tasks that are a daily part of photo editing.
Read on and I’ll show you how to do the same.
What AI Tools Has Adobe Added to Lightroom & Photoshop?
In this fast-paced, changing world, we have been swept up in an AI whirlwind.
Some of us have reacted in delight, been intrigued, and others have hidden in fear, waiting for the debris to settle.
Adobe has responded to unexpected, irreversible changes in the way it always does: by embracing them head-on with curiosity and expertise.
The company has redesigned its software to fuse AI features with manual editing tools, creating a smooth and streamlined photo-editing experience.
This forward-looking attitude is what keeps Adobe ahead of the game, enabling its users to harness the benefits of AI rather than be swept away by it.
Why Incorporate AI
Personally, I wouldn’t turn back the clock to the time before AI, so please don’t make me.
It already seems like a lifetime ago that I had to create selections using the pen tool, painstakingly picking out each tiny but crucial pixel.
The fusion of AI and manual editing that Photoshop and Lightroom offer is perfect for me, as it creates an incredibly smooth user experience.
Adobe’s AI tools allow me, as a photo editor, to quickly complete tedious and repetitive tasks by utilizing AI’s superior capabilities.
AI is the master of focus and speed, while little ‘ol me, I am the master of design and creative vision. Pair the two together, and we have a dream image editing machine.
Adobe Photoshop’s AI Tools and Features
Adobe has taken its users on a fascinating journey, from the cumbersome pixel swapping to the glamorous photo manipulation layer feature.
Photoshop’s first brush with AI-like tools was the Content-Aware Fill tool.
Content-Aware Fill was introduced in 2010 as a pattern analysis tool that used a smart algorithm to intelligently fill an area with surrounding pixels.
Although this appears to be similar to an AI tool, it isn’t one. This is because it indiscriminately picks pixels without discernment. Thus, it can mistakenly mix a hand into a wall or a flower into the sky.
Photoshop’s first AI tool, the Select Subject tool, was added in 2018. This tool used deep learning to analyze complex scenes and correctly select a subject.
The next tool added was Neural Filters, which can change a subject’s expression and age.
In 2023, Adobe’s Firefly was added. Firefly is Adobe’s generative AI engine.
Generative tools include Generative Fill, Generative Expand, Generative Image/Background, and Generative Upscale.
Other Photoshop AI-powered tools are Harmonize, the Enhance Object Removal Tool, and the Improved Remove Tool.
Let’s dig in and find out what they do.
Let’s Get AI Generative
So far in 2025, we have Generative Fill, Generative Expand, Generative Upscale, and Generative Background.
The Generative Tools are AI content-aware tools that can create new components to include in an image.
The Generative tools are available in Photoshop (Beta). To find a Generative tool, head to the Contextual Text Bar.
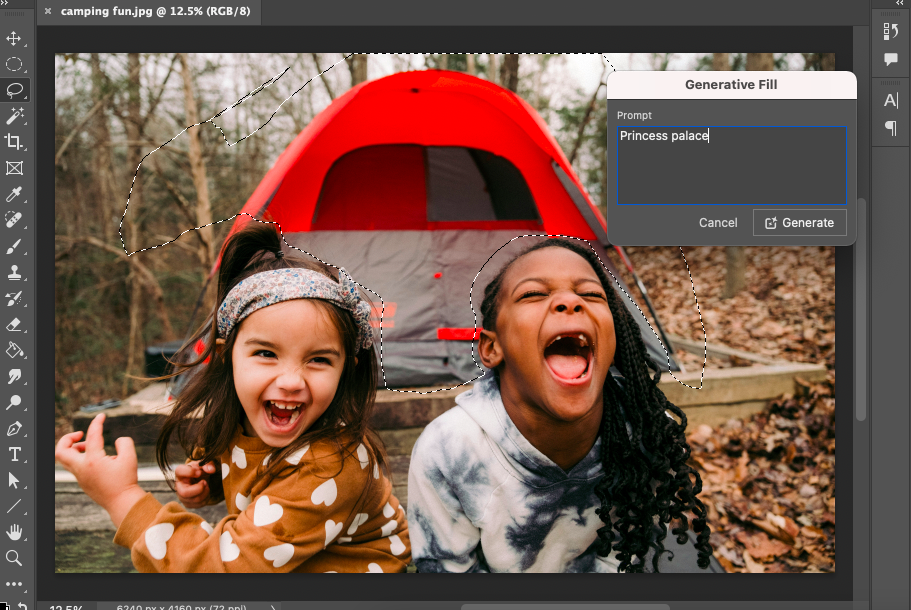
Generative Fill is used to add items to a selected area. To use it, create a selection of the area you wish to fill with a selection tool and add your text prompts in the Contextual Text Bar.
When prompted, Photoshop’s AI will generate a selection of new fills for the editor to choose from. If you don’t like any of them, you can reprompt.
I use Generative Fill to add elements or remove objects.
In the image below, the prompt was “princess palace” to change the tent.
However, the “princess palace” generated was a similar tent.

When a fill generation is selected, it’s added as a new layer. I find this useful, as it means you can adjust the item’s position, composition, or delete it.
Generative Expand is used to extend images past their original border. This is fantastic if you have an image that’s cropped too tightly.
Not only can you crop images to downsize, you can upcrop to upsize! Revolutionary.
You can recover areas that were lost in a previous crop, or just create new photo territory.
Photoshop’s AI will intelligently calculate the background. If it’s a forested landscape, Photoshop’s AI will replicate this landscape to blend seamlessly with the existing one.
If it’s a living room or a cityscape, Photoshop will again seamlessly incorporate an expansion.
Below, I’m adding more to the canvas because, although it’s an interesting image, it’s cropped too tightly.
I use “snowy mountain” as my prompt, using Photoshop’s online app.

As with the Generative Fill, you will be offered a few choices, and you can decide which Generative Expand best suits your composition.
It automatically extends into the new canvas, replicating the original background.
I have used Generative Background more than Generative Expand.
This Generative AI tool will select the foreground subject and add a new background based on your prompts.

Generative Upscale is useful when you have an image with low resolution.
Usually, a pixelated photo would have to be ditched. Possibly, you could have added a Gaussian blur filter; the soft focus might have saved it.

Now, however, using AI’s ability to intelligently interpret images and calculate where to add extra pixels, it’s possible to upscale and save an image.
You will no longer have to discard low-quality images.
Photoshop’s AI Neural Filters
AI filters range from super fun to deadly professional, and Photoshop incorporates both into its software.
From pro skin smoothing in an instant, to quirky gender swapping and age dropping, it’s all there.
Neural Filters are available in Photoshop’s Beta and Classic versions.
Head to Filter in the top menu bar and in the drop-down menu select Neural Filter, then the Neural Filter workspace will open.
Photoshop has Portrait, Creative, Color, Photography, and Restoration AI Filters.
Using the Portrait AI filters, you can retouch portraits, smooth skin, add makeup, and change expressions with a simple click of a button.

Nothing is so easy as an automatic virtual makeover to chase away the blues, or you can add on years to see how AI thinks you will age.

Experimenting with Photoshop’s AI Neural filters to change a model’s expression or mood is interesting.
There are two AI Neural photography filters, Depth Blur and Super Zoom.
The Restoration filters include the JPEG Artifacts Removal Filter, which removes artifacts that occur due to JPEG compression, and a Repair filter, which can remove scratches, blemishes, and enhance details of a photo.
In the Color Filter section, you will find all you need to adjust the colors of an image.
The Harmonize Neural Filter is a priceless AI tool incorporated into Photoshop. It automates a common, tedious editing task, so we don’t have to spend our time tweaking and correcting lighting.
This AI filter tool is useful when you’re inserting a new element into an image. It will analyze the colors, saturation, light, tone, and shadows of the element and the scene into which it will be imposed, blending the two convincingly.
This is an automatic edit that requires no creative inspiration; it’s a task, not a creative decision.
The Colorize Filter will restore color to black and white photos, and Color Transfer will apply the color information of one layer to another. This is useful when you’re restoring old black-and-white photos.
The Creative Neural AI filters include a Transfer filter. This will take the style or texture of one image and apply it to another image. If you wish to add an oil painting texture to your photo, this is the AI filter to use.
The Landscape mixer will adjust a landscape photo by adding weather, season, or time references to it.
The image below was a sunset photo. I adjusted the Day slider, and the sunlight was increased, changing my photo from a dark dusk photo to a midday photo.

Using Photoshop’s AI Neural Filters, you have everything you need to restore old photos, enhance portraits, and harmonise the color between layers.
Plus, you can experiment with the creative filters and funk up a landscape collection or add a new vibe to a family album.
Just remember that once the filter is added, that’s it; there is no going back. You can undo the edit in the History panel, but the edit is not added as a masked layer.
I would suggest creating a duplicate layer before applying the filter, so you don’t lose the original image.
Lightroom’s AI Tools
Similarly, Adobe has incorporated AI tools into its Lightroom photo editing software, creating a smoother user experience for all photo editors.
Photoshop is the tool of the photo editor who likes to create after the shoot, using layers and image manipulation tools.
Lightroom traditionally is the go-to software for professional photographers used for global adjustments, organizing, and managing photos.
Lightroom’s Select and Mask Subject or Sky
Lightroom now incorporates AI editing features similar to Photoshop. Using AI, Lightroom selects a subject and then masks it.
Using AI masking tools, an editor can now mask the sky or subject with one click. Yes, I love time-saving AI tools.
It’s the opposite of Photoshop, which covers the section you don’t want. Lightroom instead covers the area you wish to edit.
To use Lightroom’s masking, go to the top menu bar and select Tools. From the drop-down menu, select the type of masking you wish to use, such as subject, sky, background, or people.

As you can see in the image above, Lightroom’s AI has perfectly selected and masked the eagle. Lightroom’s AI takes a fraction of a second to complete the selection.
Once the subject or background is selected, adjustments to the masked area can be made without affecting the rest of the image.
Using AI to select the area of a photo will cut down on countless hours of editing time.
This is the ultimate beauty of AI: speed and accuracy.
Lightroom’s AI-Powered Auto Adjust
Professional photographers pride themselves on taking photos with the correct exposure. It’s the constant quest for the perfect image that needs no post-shot editing.
However, more often than not, a photo or even an entire album will need slight global adjustments.
Lightroom has been the trusty right-hand man, used by photographers for decades, for post-shot tweaks.
Now, using AI-powered Auto Adjust, photographers can load up their photos into Lightroom, and AI will automatically correct exposure, contrast, highlights, and other settings.
The photographer only has to select Auto Adjust.
How is this possible, you might ask!
Using AI learning, Lightroom’s adjustments can be honed to a photographer’s preferences. To train AI, photographers upload reference photos, which gives AI an indication of their unique style.
AI is indispensable to photographers who value their free time.
Lightroom’s AI Presets
Thanks to smartphone cameras, most people are familiar with presets. Who doesn’t know how to use a preset to add a warm summer glow or a romantic haze to a selfie before sharing it with the world?
A preset is a saved set of photo edits that are automatically applied to a photo, altering the exposure, light saturation, and contrast.
This might seem like AI, but it’s not. Traditional presets didn’t discriminate between photos, applying the same edits to every image, whether they were underdeveloped or overdeveloped.
Not discriminating might be politically correct in other situations, but when it comes to editing photos, I personally like it when AI treats each photo differently.
If I add a non-AI preset to an album, I have to check the entire album to see if edits on individual photos need to be corrected.

In contrast, an AI Preset will access the photo’s exposure, saturation, and contrast, and adjust the preset to achieve the required outcome.
What makes me happy is that I don’t have to manually check each photo post preset application. This saves me precious time.
Lightroom’s AI Denoise
I use Lightroom’s AI Denoise feature to reduce unwanted noise in my images. It works similarly to Photoshop’s AI Upscaler.
This is particularly useful when a photo has been taken in low light, such as at a music gig, when you can’t use a flash.
Lightroom’s AI Denoiser intelligently discerns what new pixels need to be created to sharpen the image.
Photoshop’s AI Generative Upscaler and Lightroom’s AI Denoise give us the option to rescue low-grade photos that we otherwise would have thrown in the bin.
Lightroom’s AI Generative Remove
The Generative Remove tool is a new Lightroom tool that removes unwanted elements in an image.
Generative Remove will then fill the empty area with a new generation based on the surrounding area.
Using Lightroom’s AI, photographers can reap the benefits of fast and consistent edits on entire albums.
AI can do a job in seconds that would typically take a photo editor hours to complete manually.
Adobe has an advantage as Lightroom and Photoshop can utilize the same AI framework, via Firefly.
Photoshop’s AI tools support highly creative projects, while Lightroom’s AI supports fast, concise edits and batch processing.
Adobe – A Flagship Product
Adobe has always strove to be at the forefront of photo editing, and it has been no mean feat to stay ahead of all the ingenious and creative minds across this planet.
How does Adobe keep ahead of the game? One way has been to hire the world’s top minds and talent.
Another is to keep an eye on the game and strategize how to incorporate the latest trends into its software.
It’s essential to keep up with the latest tech, and AI tools are the latest hot item to market.
To ignore the potential that AI offers and instead remain a purely manual photo editing software would cost Adobe heavily.
I, for one, am grateful to have the high-end products that Adobe has created at my fingertips.
Adobe ensures that users will always have the smoothest, most streamlined editing experience.
To Finish Up
We could always rely on Adobe to stay ahead of the photo editing race and provide a high-end image editing experience.
Now we have the bonus of integrated AI tools via Adobe Firefly. This is incredibly useful when there are numerous tasks that take up far too much time; AI can whizz through them.
In my humble opinion, Adobe’s integration of AI offers a superior user experience: you can switch quickly from manual editing to AI and back to manual editing.
It sure beats jumping from one software program to another. Everything is available in one program.
The bountiful options to play and create using Photoshop’s generative AI tools are exciting. We can quickly trial creative ideas and bring them to life without hours of editing.
Using Lightroom’s AI tools saves time on tedious tasks, such as AI presets, which allow you to rapidly edit an entire wedding album to create a consistent signature look.
I believe Adobe has interwoven the top AI tools with the most crucial manual tools, so photo editors can unleash their creativity and design with minimal effort.
I, for one, enjoy being liberated from tedious tasks. Now I can fully immerse myself in what I love: photography.
Credit : Source Post